Tables are a powerful tool in Microsoft Word that can help organize and present information clearly and effectively. Whether you're preparing a report, a document with data, or a structured form, tables allow you to arrange text, numbers, and graphics into rows and columns for easy comparison and analysis.
This guide will cover everything you need to know about creating and formatting tables in Microsoft Word. We will start with the basics of inserting a table and move on to more advanced techniques, such as adjusting the layout, merging and splitting cells, and applying custom styles to make your documents look more polished and professional. At the end, we’ve included a section on best practices for formatting tables for translation.
Creating a Table in Microsoft Word
Insert a Table
- Open your Microsoft Word document.
- Place your cursor where you want to insert the table.
- Go to the Insert tab on the Ribbon.
- Click on the Table button.
- A grid will appear; hover over the grid to select the number of rows and columns you want, then click to insert the table. Alternatively, click on Insert Table... for more options, where you can specify the exact number of rows and columns.

Formatting a Table in Microsoft Word
Adjusting Column Widths and Row Heights
Adjusting the column widths and row heights in a table allows you to customize the layout to fit your data.
- Hover over the border of a column or row until you see a double-sided arrow.
- Click and drag to adjust the width or height as needed.
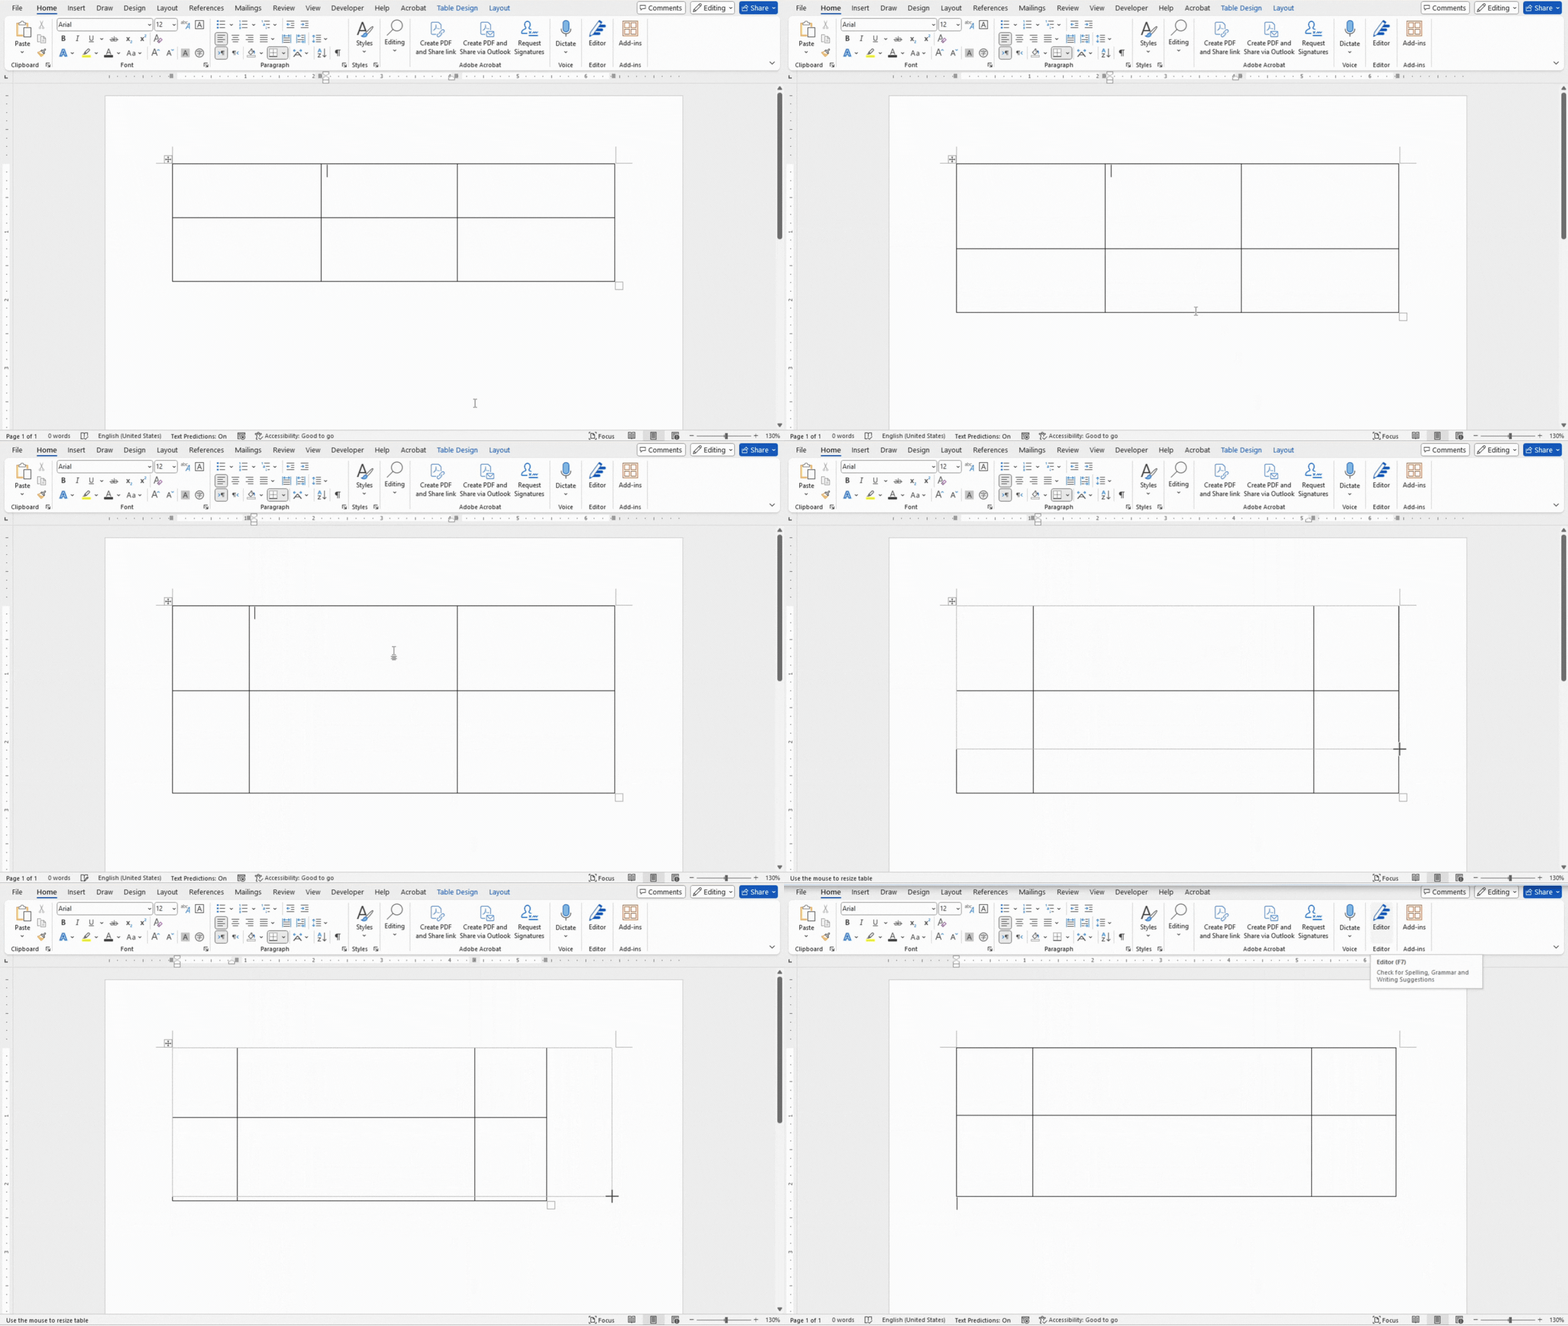
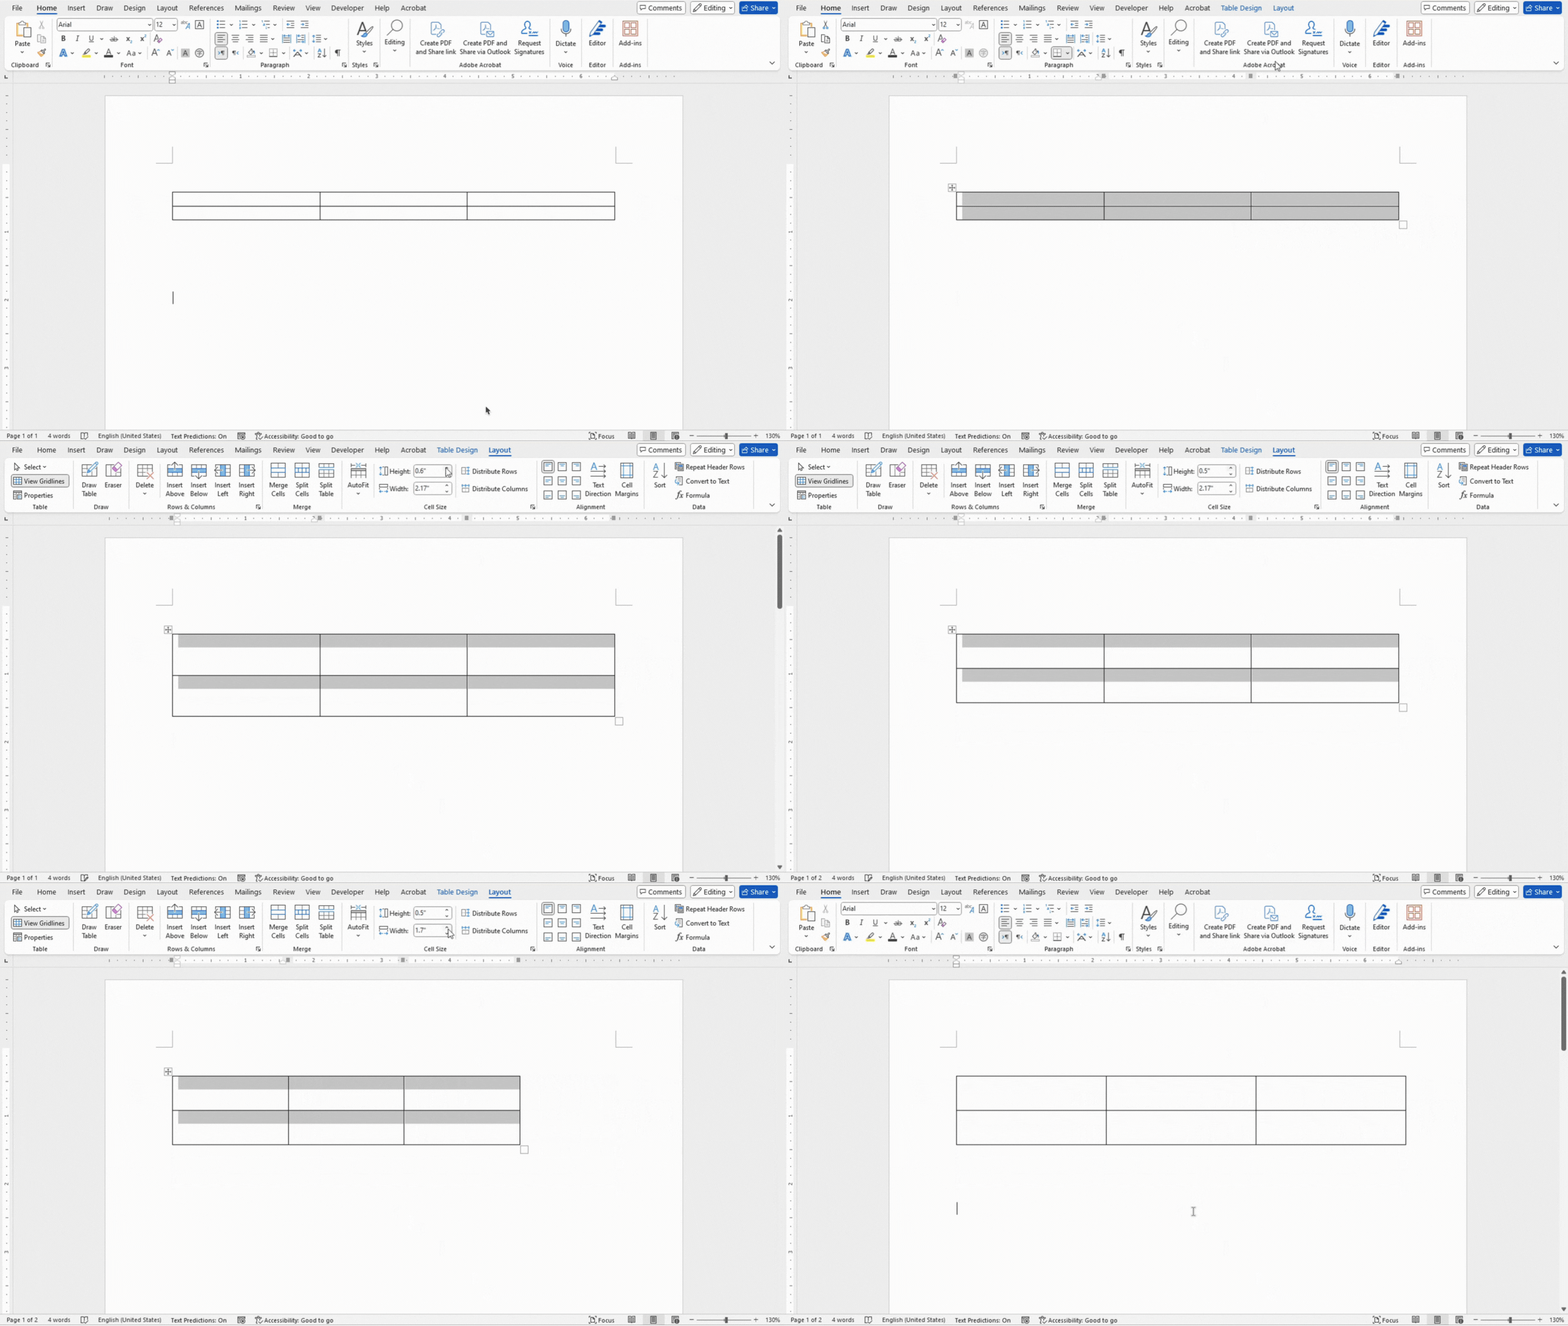
- Alternatively, select the cells and adjust the width and height in the Layout tab.
Text alignment
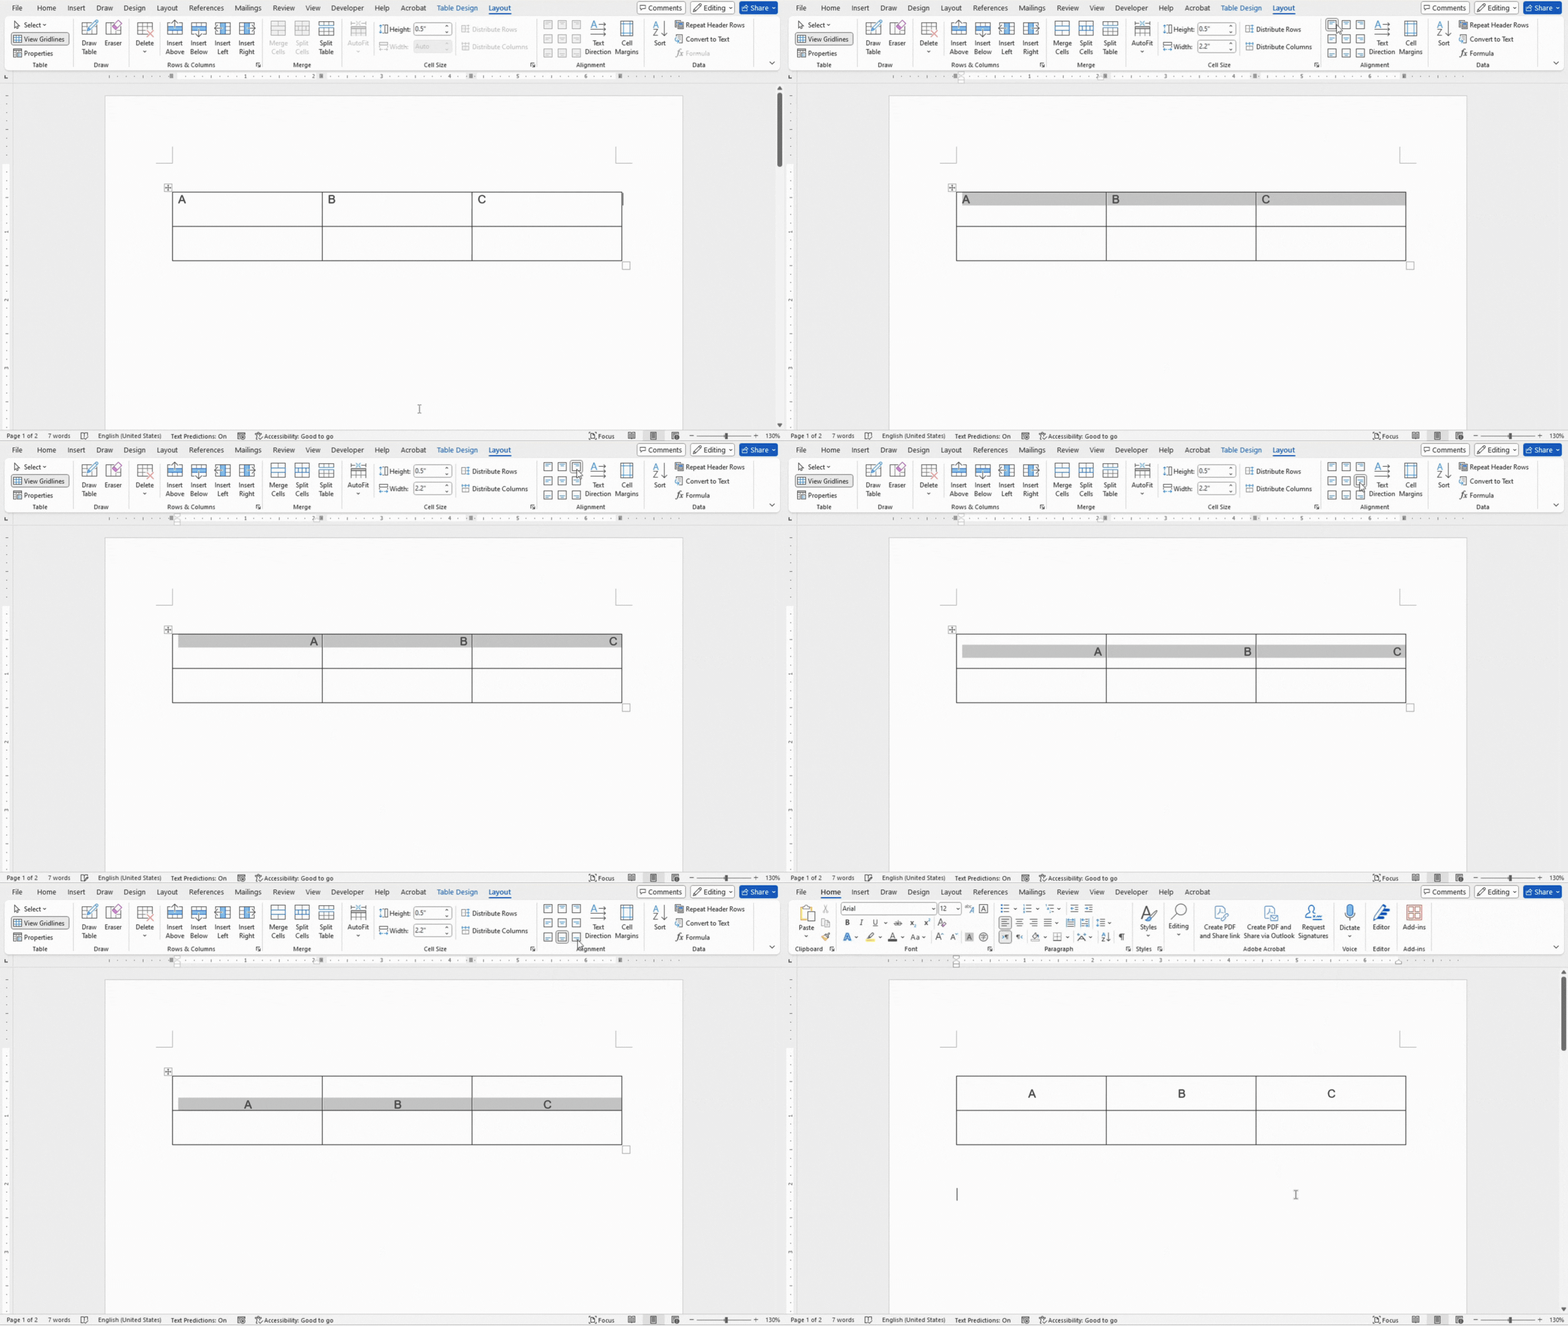
Aligning text properly within table cells can greatly enhance the readability and overall appearance of your tables. Microsoft Word provides several options for text alignment in table cells, allowing you to customize how text is positioned both horizontally and vertically.
- Select the cells you want to adjust the text alignment of.
- In the Layout tab, you can choose between 9 different options for text alignment within the cell.
Merging and Splitting Cells
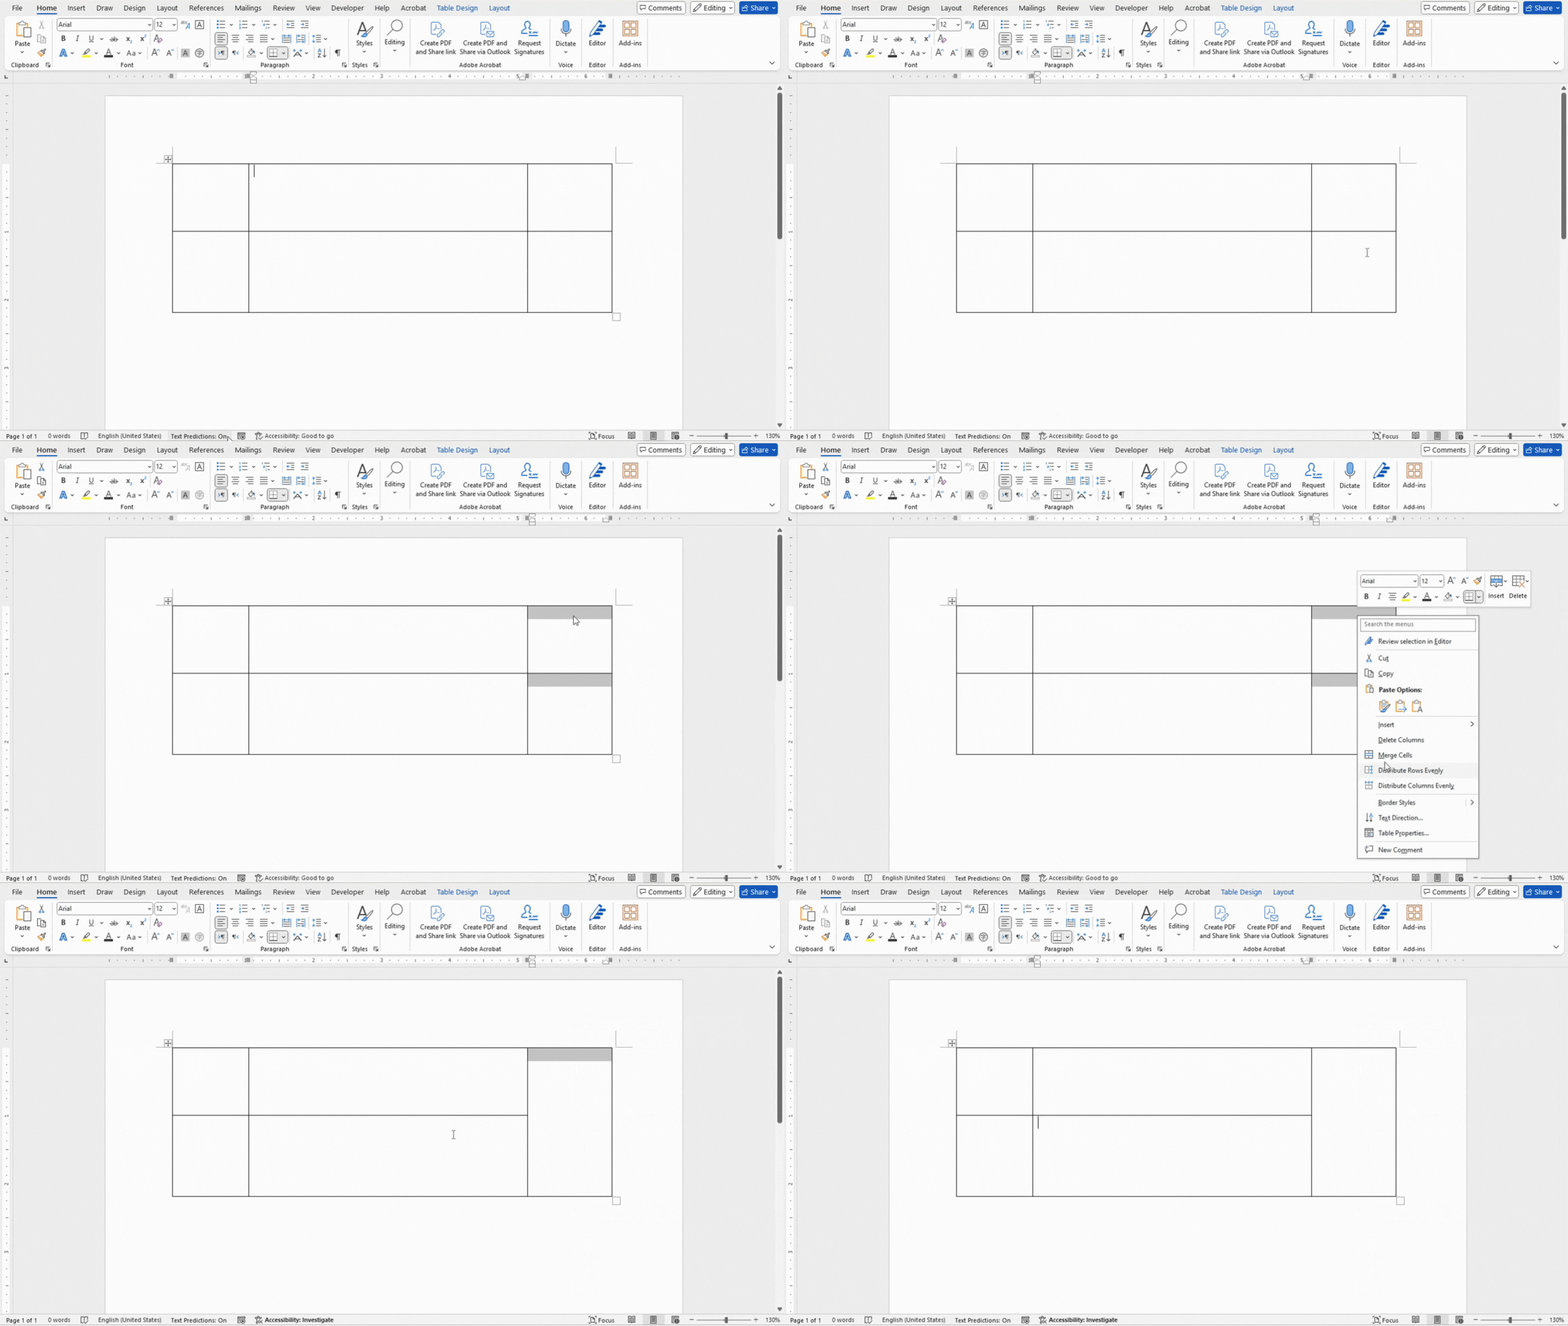
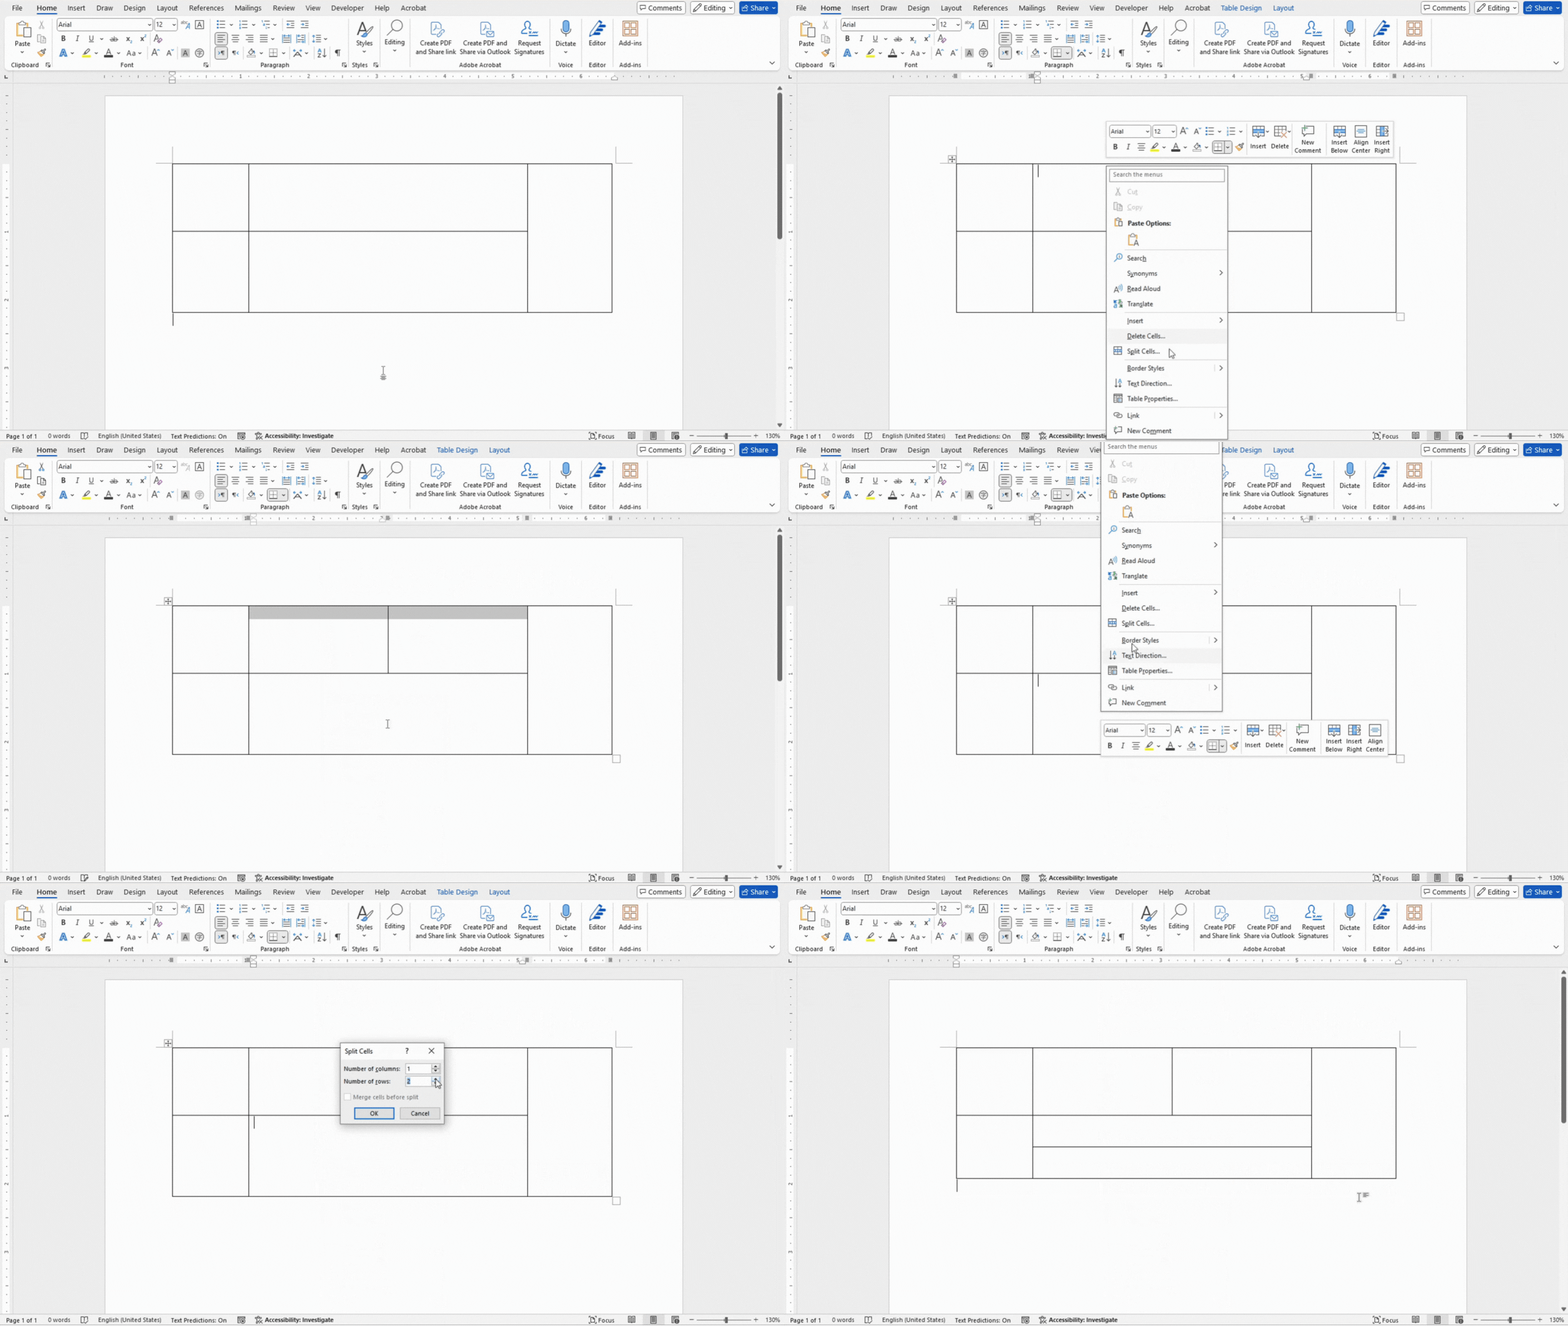
Merging and splitting cells allow you to customize the layout of your data. Merging cells can combine multiple cells into one larger cell, which is great for creating headers or grouping related data. Splitting cells, on the other hand, divides a single cell into multiple cells, making it easier to organize detailed information.
- Select the cells you want to merge.
- Right click and select Merge Cells.
- To split a cell, right click inside the cell and click on Split Cells. Specify the number of columns and rows you want to split the cell into.
Adding Borders and Shading
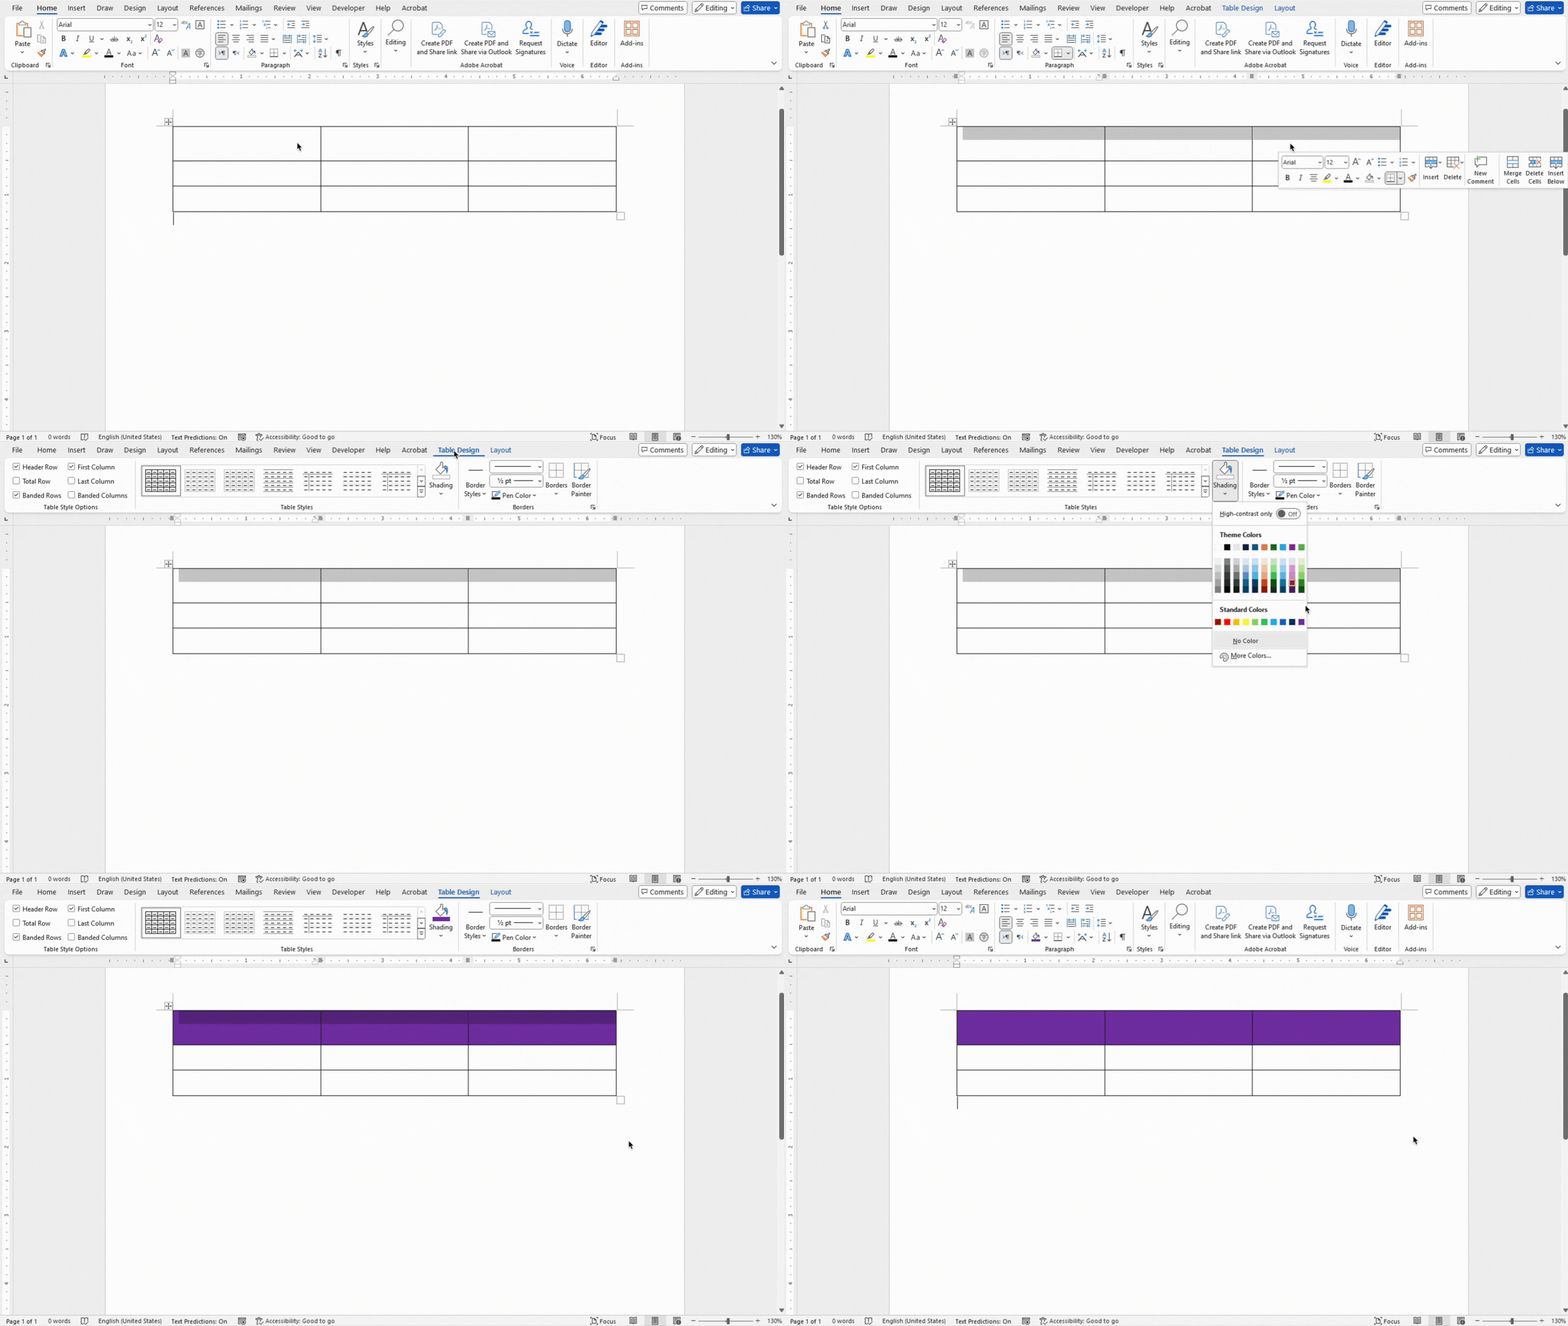
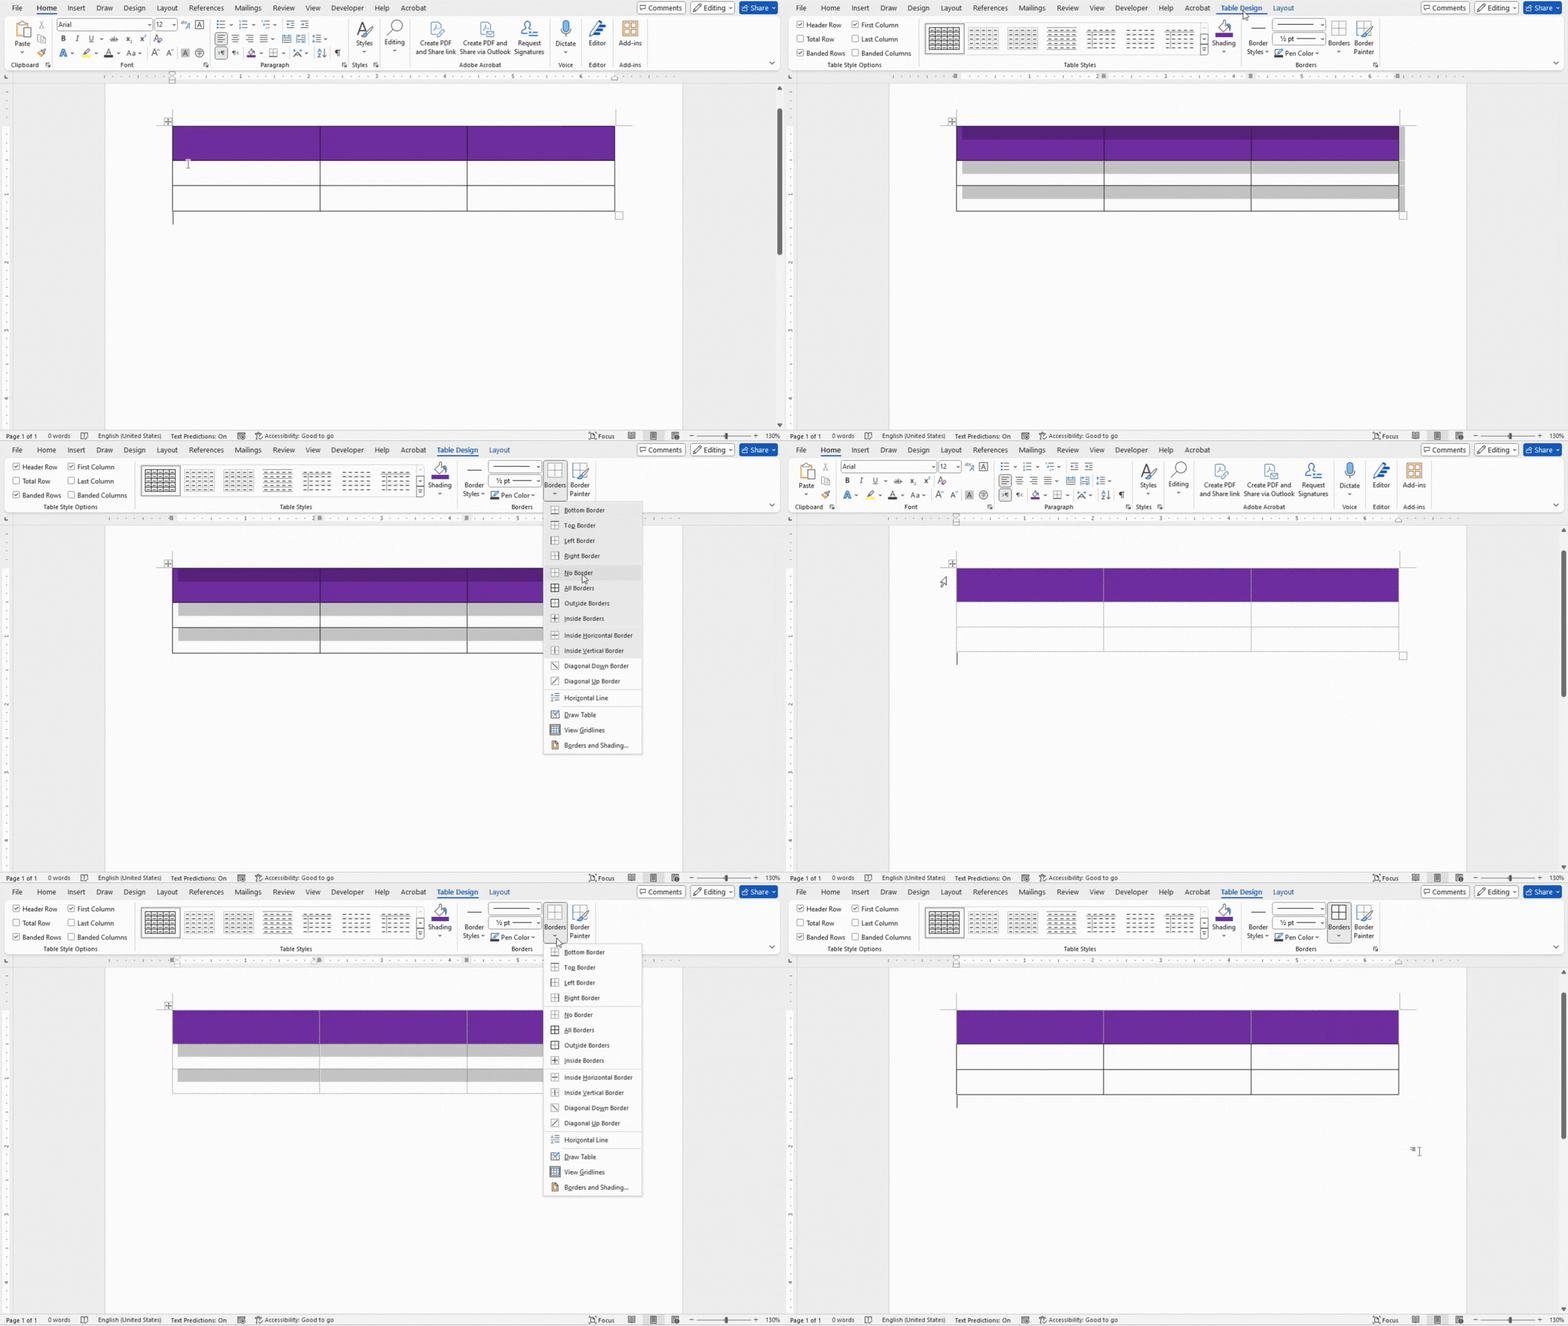
Adding borders and shading to your tables can significantly enhance their appearance, making them more visually appealing and easier to read. Borders help define the structure of your table, while shading can be used to highlight specific rows, columns, or cells.
Shading
- Select the cells, rows, or columns where you want to apply shading.
- Use the Shading button under Table Design to apply background colors to selected cells.
Borders
- Select the cells, rows, or columns where you want to apply borders.
- In Table Design, use the Borders dropdown to select the type of border you want (e.g., All Borders, Outside Borders, No Border).
Advanced design: Rounded corners
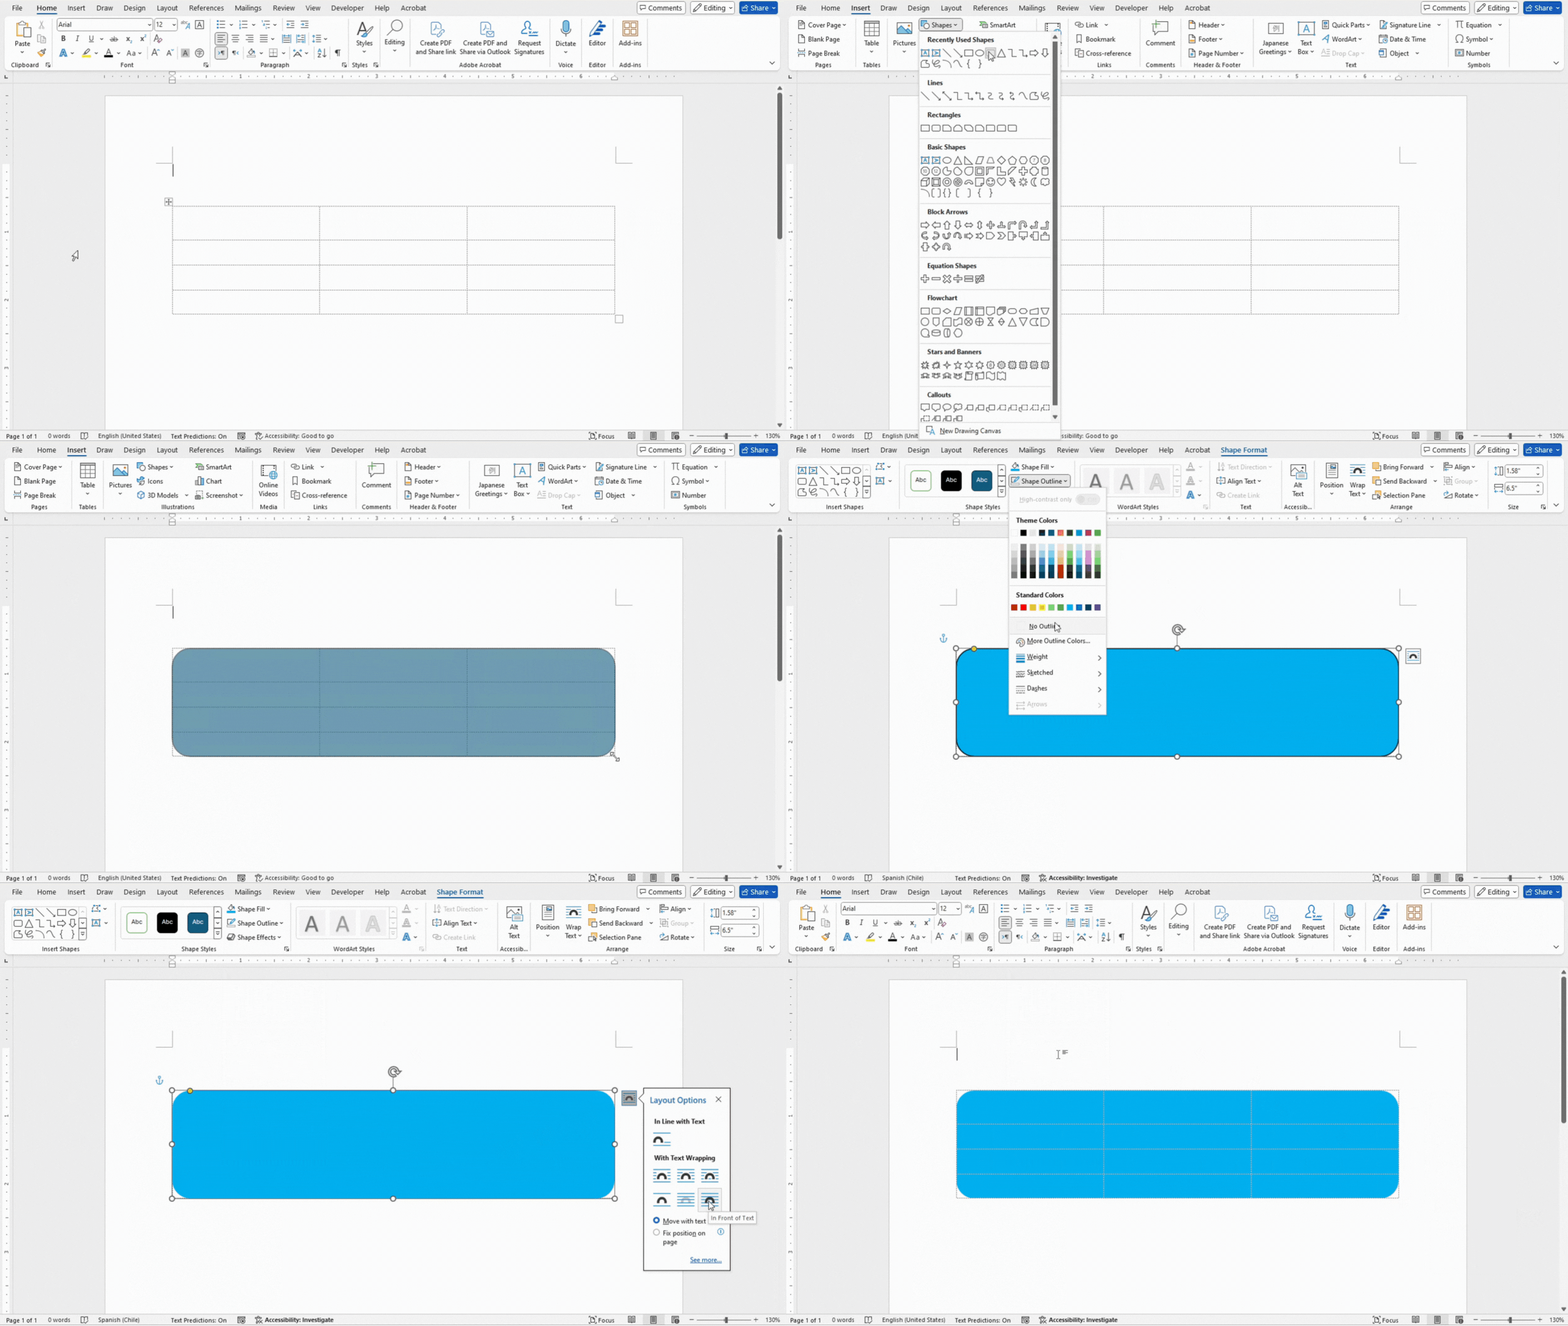
Microsoft Word does not have a built-in option for rounded table corners. However, you can achieve this effect with the following workaround.
Ensure your table has no borders. When the borders are removed, gray dotted lines will appear around the table:

- Go to the Insert tab and then Shapes.
- Select the rectangle shape with rounded corners.
- Draw the shape over the table and select the desired fill and border color.
- Click on the Layout Options icon at the top right corner of the table.
- Select Behind Text. This will place the shape behind the table.
Sorting and Filtering Data
- Click anywhere in the column you want to sort by.
- Go to the Layout tab under Table Tools.
- Click on Sort, and choose your sort options (e.g., ascending or descending order).

Table shortcuts
Using shortcuts for tables in Microsoft Word can significantly speed up your workflow. Here are some handy ones to know:
- Insert a Table:
Alt + N, T(then select the table size) - Move to the Next Cell:
Tab - Move to the Previous Cell:
Shift + Tab - Move to the Next Row:
Down Arrow - Move to the Previous Row:
Up Arrow - Insert a New Row at the Bottom:
Tab(while in the last cell of the last row)
Bonus: Best practices for translation
When working with tables in Microsoft Word for translation, following best practices can help ensure the translation process is smooth and accurate. By doing so, you not only facilitate the work of translators but also ensure that the final translated document maintains the clarity and accuracy of the original.
Here are a few key considerations when preparing tables for translation:
Prepare for Text Expansion
When preparing tables in Microsoft Word for translation, it is essential to account for text expansion and. Setting fixed column width will allow the translated text to expand, if necessary, without disrupting the table layout.
Avoid Text Boxes in table cells
Many translation tools, especially automated ones, are designed to read and interpret text that is placed in a straightforward manner, such as within table cells or as part of the main body of a document. Text boxes, however, are often treated as separate elements or layers in a document. This can cause translation tools to either skip them entirely or to handle them poorly, leading to incomplete translations or formatting issues.
Avoid Manual Line Breaks
Manual line breaks can break up sentences and phrases in unnatural places, making it difficult for translation tools to understand the context. This can lead to incomplete or inaccurate translations, as the software may treat each segment separated by a line break as a standalone piece of text.

Use Simple Table Designs
Avoid using nested tables (tables within tables), as they can pose challenges for translation tools and translators, leading to errors such as misplaced text, misaligned content, or even skipped segments during translation. Opt for straightforward table layouts to ensure better compatibility and ease of translation.
By following these best practices, you can create tables in Word that are not only well-formatted but also translation-friendly, minimizing potential issues and ensuring accurate and efficient translations.

